Tuesday, November 29, 2011

Bourbon Glaze for Eggnog Pound Cake

This morning, as I was straightening my hair (random I know), it occurred to me that I should have put a bourbon glaze on the eggnog pound cake. Because I mean let's face it, eggnog is really served best with a little nip, right? Here's the glaze recipe for the classic Bacardi rum cake, but I replaced the rum with bourbon. The next time I make this cake, I'll definitely add the glaze. Let me know if you try it out!

Bourbon Glaze

* 1/2 cup butter
* 1/4 cup water
* 1 cup sugar
* 1/2 cup good bourbon

Melt butter in saucepan. Stir in water and sugar. Boil 5 minutes, stirring constantly. Remove from heat and stir in bourbon. Note: The bourbon will cause steam. Be careful not to burn yourself.


Monday, November 28, 2011

The 12 Days of Baking

I love to bake, and usually in December I'm spending lots of quality time with my Kitchen Aid anyway, so I've decided to start Project The 12 Days of Baking. I'll bake some of my holiday favorites, along with several new recipes that I've been wanting to try. I hope you'll check back often to see what's been going on in my kitchen. 

First up, Eggnog Pound Cake. I saw it in this month's Southern Living and knew immediately that I would have to try it out. Most people either love eggnog or hate it. I happen to love it, so this really appealed to me. It's rich, yet light, and the eggnog flavor isn't too overpowering. The best part is, it's super easy and is made from only 5 ingredients!

On the first day of Christmas, my true love baked for me....

Eggnog Pound Cake

5 simple ingredients: 1 16oz package pound cake mix, 1 1/4 cups eggnog, 2 large eggs, 1/2 tsp grated nutmeg and 1/2 tsp vanilla

Mix everything together and beat for 2 minutes

Pour into lightly greased loaf pan. Bake at 350 degrees for an hour. 

Garnish with powdered sugar and serve!


Saturday, November 26, 2011

O Christmas Tree

I hope everyone had a great Thanksgiving holiday. I had a busy week off, but I sure have enjoyed being home with my little one- I could definitely get used to this SAHM thing!

Every year after Thanksgiving I start to get excited about Black Friday. I usually get a thrill out of the crowds and chaos,  but this year I just wasn't feeling it. I decided to stay home with Jack and get my Christmas put up. I didn't get as far as I had hoped with my decorating, but I did get my tree all trimmed and it turned out beautiful, if I do say so myself. My tree is extremely special to me because I inherited all of my ornaments from my Aunt Margaret. She loved the holidays so much...she never lost that childhood awe of them, as adults sometimes do. My fondest childhood memories of Christmas are with her, and her spirit lives on every year when I put up my tree. She lived in New York City in a tiny apartment, yet she always had 2 full size trees, decked out to the max with Christopher Radko ornaments. She would put her tree up after Halloween and leave it up into the New Year. Here is a picture of us from Thanksgiving 1997 in her apartment in New York. Forgive the quality, as this is a picture of a picture, but you can get the idea of how beautiful she was, and her tree!


Every year I kick off the holiday season by putting my tree up. I blast my Christmas playlist, make some rich hot chocolate and get busy putting up my million and one ornaments. I cannot wait to share this tradition with Jack, though, perhaps we may get new, more kid friendly ornaments for next year ;-) 
The pictures really don't do these ornaments justice, but here are a few of my favorites. Also, I will post more pics of my holiday decor as I get it up. 


I love Halloween so much it even shows up on my Christmas tree

One of many intricate Santa's

Three Wise Men 

Parrot


Salted Hot Chocolate 

Vanilla and a touch of salt make this hot chocolate extra special!

Mix 2 tablespoons good cocoa powder with 2 tablespoons sugar and a dash of salt. Microwave 2 cups milk with 1/2 teaspoon vanilla until bubbling (about 2 mins). Whisk together well.

And of course, top with lots of marshmallows! Cheers to the Most Wonderful Time of the Year!


Thursday, November 17, 2011

Thanksgiving Activities for Kids

This will be my second year hosting Thanksgiving at my house. We have several kids in our family, age 3-7, so this year I thought it would be fun to set up a craft for the kiddos to work on after we've eaten. I got this idea from Pinterest and also did it with my second graders. It turned out super cute and I can't wait to do it with my little cousins on Thanksgiving Day!

Pinecone Turkeys


What You'll Need:
- Pinecones
-Brown Felt (you can also use brown pompoms)
- Google Eyes
- Red Pipe-cleaner
- Construction Paper
-Scissors
-Hot Glue
-Elmer's Glue

I freehand drew a turkey head on the brown felt. Add the eyes and twist the pipe-cleaner like a corkscrew for the waddle. Cut orange construction paper into a small diamond and fold in half for the beak. Cut small feathers from various colored construction paper and have the kids write something they're thankful for on each feather. You can use hot glue for everything, but I used Elmer's for the eyes, beak, and feathers and hot glued everything else. Just make sure if you use Elmer's, you're generous with it. These little turkeys will make great centerpieces for the kid's table at Thanksgiving lunch! 

Here are some that my second graders made:


I also found this printable coloring placemat for my Thanksgiving kid's table (again, thanks Pinterest). It will keep the kids busy while they're waiting on lunch!


To find this FREE printable, as well as other cute Thanksgiving printables, click on the image above. 


Wednesday, November 9, 2011

6 Months Already?

Happy 6 months to my sweet little boy!!! It's so hard to believe he's half a year already. I know all of you moms out there know what I mean when I say that everyday with him is like unwrapping a surprise gift you didn't know you were going to get. He discovers something new everyday and I know it's just going to keep getting better. He's getting pretty good at sitting up by himself, so today I let him sit up in his bathtub rather than laying in the infant sling and it totally made my day. He discovered splashing...like, soaking mom splashing. He had an absolute ball! It was the cutest thing. Being a mom has changed me in ways I never thought possible, and that little boy just steals my heart more and more with every passing day. I love you so much mister boy!

Easy Fall Dinner

Between the internet and being a bit cheap, I have really gotten out of the habit of buying magazines. This is a big change for me because I used to be the queen of the couch with my Blue Bell (that's ice cream for all of you northern folks) and InStyle, Vogue or Cottage and Country Living (ironic combo you may think, but that's just me for you...) I'd always get a thrill out of the shiny pages and the smell. I really miss those days...but I digress. Yesterday, while waiting in the atrocious line at the grocery store, I got sucked into this month's Southern Living, which got me in the mood to start some Thanksgiving'ish cooking a little early.

Roasted chicken with veggies is a staple in the dinner rotation at our house. It's cheap, it's easy and it's pretty healthy! I try to use veggies that are in season, so this week I bought some root vegetables. I also grabbed some rosemary because I thought it would pair nicely with the rustic veggies. While I don't have an exact recipe I follow or anything, here is how I cook my chicken.


Rough chop your veggies. I leave them in pretty big pieces so they don't fall apart. Here I used sweet potatoes, carrots (real carrots, not the little stubby fake ones), parsnips, onions and whole cloves of smashed garlic (smashing it, but leaving it whole lets the oils really flavor the whole dish.) Other veggies I've done are zucchini, onion, carrots and regular potatoes. But you could basically do anything!


I take about a tablespoon of real butter (room temp) and rub the chicken skin- this helps the skin brown nicely when cooking. Then I salt and pepper the hell out of it and today I also used fresh rosemary. I also stuff the cavity with rosemary (stems and all). You can also use fresh thyme or any other herbs you like. I like to use lemons and their juice, but I wasn't sure it would go with these veggies. Normally I'd juice the lemon over the chicken and then stuff the squeezed lemons in the cavity with my herbs. Next, s&p your veggies and pour chicken broth over them until it's nearly covering them. I also put a generous amount of olive oil on the veggies and chicken. 


My general rule of thumb is bake at 400 degrees for 20-30 mins per pound, plus 15 minutes.


I decided to try the pecan pie muffins from Southern Living for dessert. Pie is one of my weaknesses (get that from my mom & dad...thanks guys) and I especially love fall pies like pecan and pumpkin, so I thought the pecan pie muffins sounded delish- and boy was I right! Even my husband, who claims not to like desserts with nuts, tried them and asked for another :-) 

Click the title link to find the recipe at SouthernLiving.com 


Luckily I had all of the ingredients for these muffins at home already, since I found the recipe at the end of my shopping trip.


Create a "well" in your dry ingredients and pour the wet in. Mix until just moistened.


Fill the bottom of the muffin tins with finely chopped pecans and fill to the top with batter.


These muffins are so yum. They're a little crunchy from the pecans and the caramelization of the brown sugar, yet moist and crumbly too. They're great for dessert or would make a sinfully good breakfast treat. Can't wait to have some with my coffee in the morning!

* Important note *

I used muffin liners because I was still a little scared from the sticking fiasco with my mini pumpkin pies. But because the brown sugar caramelizes so much in these muffins, the liners are difficult to get off, so I do not recommend using them.


Thursday, November 3, 2011

Tis the Season of Giving Thanks

November, one of my favorite months... I don't know if it's the weather, the colors outside, the impending holidays, or the fact that Breaking Dawn will be out soon, but something about this month gives me a warm and cozy feeling inside. I always wish that this time of year would creep by so that feeling would last, but it always seems to fly. Before we know it December will be here, then Christmas will have come and gone. I will try to appreciate the little things about this month and give thanks for all of my blessings (even more than usual).

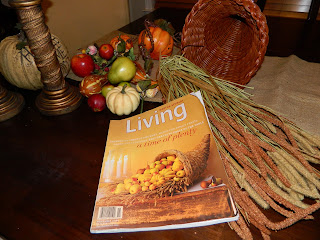
Tonight I put my cornucopia out. Several years ago, in 2004 to be exact, I bought a Martha Stewart magazine with a lovely cornucopia on the cover. Every year since then I try to recreate Martha's masterpiece on my dining room table. Of course that is next to impossible, but I try my best anyway. I love the inviting colors and try extra hard this time of year to keep the table uncluttered so I can enjoy my fall decor. This year I'm hosting Thanksgiving at my house again, so I've got some other decorating ideas up my sleeve that I borrowed from Pottery Barn. My husband will especially enjoy them because they involve deer horns and pheasant feathers. More to come on that later!

My Inspiration 


To me, there's no better feeling than to have my dining room table brimming with family and friends, food, drinks and love...


Tuesday, November 1, 2011

First Halloween Full of Treats

This was the best Halloween yet. I know Jack is only 5 months old (well, 6 next week), but seeing him in his little cow costume was the cutest thing I've ever seen. I'm definitely a proud mama and that little boy just makes my heart spark every time he smiles at me. He was out by 6pm, but his grandparents at least got to see him in his costume for a quick minute. We had our friends and family over for Jeremy's famous chili and though we only had a few trick-or-treaters, we had a great night.


My little moo cow!


Too much Halloween fun...


I made some fun spiderweb sugar cookies for dessert. This is the easiest recipe for sugar cookies ever and they are super yummy. My mom heard about it on Good Morning America a few years back and they have been our go-to rolled sugar cookie recipe ever since. It's the recipe of a White House pastry chef.


White House Sugar Cookies


  • Dough

  • 1/2 cup sugar

  • 1/2 cup butter, soft, unsalted

  • 2 large eggs

  • 1 tsp vanilla

  • 2 1/2 cups all purpose flour

  • 1 tsp salt

  • 2 tsp baking powder

  • Icing

  • 2 egg whites (from large eggs)

  • 4-6 cups powdered sugar

  • 1/2 tsp vanilla

  • 1/4 tsp lemon juice

  • liquid food color, as desired


  • Cooking Directions

    Cookies
    Combine sugar and butter and beat until light and fluffy, about 8-10 minutes with an electric mixer and paddle attachment.
    Add eggs and vanilla and blend.
    Sift flour, salt and baking powder and add. Mix until a dough forms.
    Wrap dough in plastic and chill for at least two hours or overnight before using.
    Roll on a lightly floured surface to 1/4" thick. 
    Bake at 350 degrees Fahrenheit for about 10-12 minutes until lightly browned. Baking times depend on the oven. Rotate baking tray halfway through the baking time. Do not over-bake or cookies will get too hard. These cookies should be soft.
    Let cookies cool completely before decorating.
    Makes about 2-3 dozen cookies (depending on size of cutters).
    Icing
    Place egg whites in the bowl of an electric mixer.
    Sift powdered sugar. Gradually add sugar as mixer is running on low speed. May require a little more or less sugar depending on size of egg whites used.
    Add lemon juice and vanilla and blend well.
    Divide icing into small bowls and color as desired.
    Decorate cookies as you wish.


    I knew I wanted to make circle cookies, so I rolled my dough into logs before freezing, then just sliced and baked.


    First frost (again with the funky orange..)


    Use white gel icing to create a swirl


    Drag a toothpick through the swirl to create the spiderweb look.


    ***Notes on the cookies and icing***

    The key to these cookies is beating the butter and sugar for 8-10 minutes. I let it go for 10 so it's nice and fluffy. Also, do not over-bake! It will dry the cookies out. They may look a little underdone, but trust me, they're supposed to be that way in order to stay soft. You can sub cold water for the egg whites and I skip the vanilla and lemon and use almond extract instead.

    I'll be making these again in a couple of months for Christmas!