Saturday, October 29, 2011

Halloween Overdrive

So many Halloween projects, so little time! Today I made a Halloween trail mix, aka "Scarecrow Crunch" for Jack's daycare teachers and witch hat cookies for our neighborhood Halloween party. I also got to dress my little Milkdud up in his cow costume for the neighborhood party. He was seriously too cute! I didn't get many good pics, so hopefully I'll get some Monday and then post them.

Tomorrow I plan on either making pumpkin whoopie pies or spider web sugar cookies for our Halloween dinner Monday evening. We'll also carve our pumpkin tomorrow. I can't believe October is winding down already... I'm sad, but also excited because that means Thanksgiving and then Christmas! Have I mentioned how much I love the holiday season? I see a busy future ahead!

Scarecrow Crunch Trail Mix


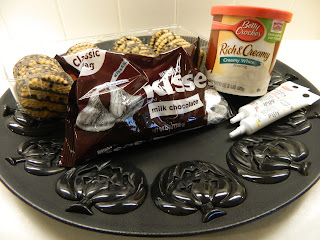
Witch Hat No Bake Cookies


* Quick rant... Why can't I find orange colored frosting? I'm awful at making it! It always comes out too fleshy looking... I couldn't even find it in the tube. Oh well, it worked I guess!


These were a big hit with the kids at the neighborhood Halloween party. And so simple to make!

Stay tuned for more Halloween fun!


Thursday, October 27, 2011

Mini Pumpkin Pies Peter Out...

I had this grand idea to do a fun and seasonal multi-sensory writing project with my second graders. We have been studying descriptive sentences using your 5 senses, and I'm always having them imagine the taste sense, so I thought it would be great to bake them something. I found some adorable mini pumpkin pies on Pinterest that I knew the kids would love. In addition, I would read Miss Fiona's Stupendous Pumpkin Pies, which is one of my favorite Halloween stories. Unfortunately though, the pies were a bust. As much as I hate to admit it, I do have a kitchen flop every now and again...

First of all, you start by cutting mini pumpkins out of your crust and putting them in mini muffin pans (I took some help from the store and used the pre-made rollout crust in the refrigerated section.) There was my first problem. My pumpkin cookie cutter was way too small, so I stuck two together, but it made for a sloppy and too thinly stretched crust.


I don't know if it was the too thin, torn crusts, or that I should have sprayed some Pam in the muffin tins, but my little pumpkin friends did not want to leave their cozy home. They stuck really bad and also did not look anything, and I mean anything like the adorable ones I saw on Pinterest. Epic. Fail. :(

I did manage to get 3 out and they were...well, a bit sad, but here they are anyway.


Regardless, they still tasted good, even if we did have to eat them with a fork straight from the muffin tin. But, I promised my kids pumpkin pie, so I rolled out another crust and made a boring old regular pie for the them tomorrow. Hopefully they'll still have fun, I'm sure they will.

You will be seeing this again, as I plan on trying to master this mini pumpkin tart art. Here is the link to Bakerella and what they should have come out like. Like my bff and I always say: when something doesn't work out, don't give up, try, try again! Haha!


Sunday, October 23, 2011

Girls' Night In

I think my friends and I have started a new trend. Girls' night in is SO the new girls' night out! We had all of the classic elements of your classic GNO (cute outfits, food & drinks) but we did it all in the comfort of my house and no one had too far to travel home. Plus, we made cute crafts to boot! I'm gonna go ahead and call it the new "it" thing. Look for it in next months People "What's Hot, What's Not" section!

I decided to go with a Halloween decor since my house was already decked out in black and orange. We needed my dining room table for workspace, so I moved the decor to the bar to set the stage for our food. I served bacon, cream cheese and jalapenos pastries (a Pinterest find no doubt), Brie with fruit, chocolate & candy corn dipped pretzels, and Rolo brownie bites (also a Pinterest find). My girlfriends also brought an array of other yummy treats including pumpkin chocolate chip cookies and warm baked Brie. Yum!

Bacon, Cream Cheese & Jalapeno Pastries


All you need is crumbled bacon, chopped fresh jalapenos and refrigerated crescent rolls. Stuff everything into the triangle and turn into a pretty little twist. Bake at 375 degrees for 15 minutes. These easy little poppers are definitely a new party fave of mine!


Rolo Brownie Bites


I followed this Bakers Royale recipe and made these brownie bites from scratch. Don't get me wrong, they were delish, but next time I will just save myself some time and use a box recipe. I also left off the icing and caramel topping and I'm glad I did because these babies were ultra rich!

Chocolate & Candy Corn Dipped Pretzels


I put a Halloween spin on these classic chocolate dipped pretzel rods by rolling them in chopped candy corn. I served them bouquet style in a small Mason jar with candy corn as a filler.

Here's the whole spread including all the goodies my friends brought:


Now, for the crafts. We took old or cheap picture frames, spray painted them all nice and shiny, and filled them with scrapbook paper. Then we took bulldog clips and put them on the glass or frame so you can just interchange your pictures without taking them in and out of the frame. There were a couple of kinks, but all in all they turned out super cute!


Here's what the frames were supposed to turn out like, with a spray painted bulldog clip on the front of the glass. However, I bought epoxy to adhesive them to the glass, and it didn't work. Next time I will use hot glue.


Here's the final product- I love them! And Jennifer was extra creative and brought lace to spray paint over, so some of the frames have a lacy look- cute!


What a fun night! Wonder what we'll make next time?

Thursday, October 20, 2011

DIY Personalized Wine Glasses

Drinking wine is just more fun when your glass is personalized, don't you think? This is yet another idea I found on Pinterest and I thought it would be fun to make them for my girls' night in tomorrow. They turned out super cute and were really simple and quick to make.

You will need wine glasses, chalkboard paint (did you know they make it in fun colors like pink and green too?), a fine paintbrush and regular Scotch tape.


Wrap a small piece of tape around the base of the wine glass and fold the corners down for easy removal.


Paint 2 coats of chalkboard paint. The bottle says to allow for 24 hour drying period in between, but I only waited about 30 mins and it worked fine. Let the final coat dry overnight.


Cute and fun!


Note: The instructions on the paint say to "season" the painted surface with chalk before using, so I just scribbled some on and rubbed it in before writing on them.

PS: Be sure to check back sometime this weekend for all of the pics and recipes from my "Girls' Night In" crafting party!


Pin It

Wednesday, October 19, 2011

Happy Birthday Mimi!

Today I'm dedicating my post to one of the most important people in my life, my Mimi. Today she is 75 years young and doesn't miss a beat. She is a true southern belle and the epitome of class and grace. She has taught me nearly all I know about the things I share with you, cooking, decorating, etc.  She taught me how to set a table, eat with my hand in my lap, write a thank you note and serve myself last when hosting a party. We share a love, no a passion of food, Paris, and clothes! I can confide in her about anything and know that no matter what, she is still my biggest fan. We are kindred spirits and I love her more than she knows. Mimi, I hope that one day I will be half the kind, strong and gracious woman that you are! Happy Birthday!!!


Tuesday, October 18, 2011

Barefoot Contessa Italian Wedding Soup

Today was an exciting day around town. It was the first day that truly felt like fall. The high was about 73, but the windchill made it feel about 60. Dare I say, it was even a little...chilly? One of my second graders even thought it was "freezing!" But I guess when we're used to near 110 days, 60 does feel downright cold. Regardless, it put me in the mood for some cool weather comfort food. I'm not a fan of Italian wedding soup in general, but this recipe has yummy baked chicken sausage meatballs and fresh parsley and spinach, which give it a unique and flavorful taste. I first tasted this soup when visiting friends in Boston a few years ago and I've been making it ever since. It's Ina Gartner's recipe, and as she would say "It's just fabulous."

For the meatballs

1/4 lb ground chicken
3/4 lb chicken sausage (I use chicken spinach feta sausage)
2/3 cup white bread crumbs (Ina says fresh, but really...)
2 teaspoons minced garlic (2 cloves)
3 tablespoons chopped fresh parsley
1/4 cup grated Romano cheese
1/4 cup grated Parmesan cheese (plus extra for serving)
3 tablespoons milk
1 large egg, lightly beaten
Kosher salt and freshly ground black pepper

For the soup

2 tablespoons olive oil
1 cup minced yellow onion
1 cup diced carrots
1/4 cup diced celery
10 cups chicken stock (Ina says homemade, but again, really...)
1/2 cup dry white wine
1 cup small pasta such as stars
1/4 cup dill (I eliminate)
12 ounces baby spinach, washed and trimmed

Preheat oven to 350 degrees.

For the meatballs, combine all ingredients and gently combine with a fork. Drop 1 inch meatballs onto a sheet pan lined with parchment paper. Makes about 40 meatballs. Bake for 30 minutes, until cooked through and lightly brown. Set aside.

In the meantime, heat olive oil over medium heat in a stockpot. Add onion, carrots and celery and saute until softened. Add chicken stock and wine and bring to a boil. Add the pasta and cook for 6-8 minutes until tender. Add the meatballs and simmer for 1 minute. Stir in the fresh spinach and cook until spinach is just wilted. Taste for salt and pepper. Serve with a sprinkle of parmesan cheese.


I love this soup because it's really easy to throw together after work, yet it truly tastes like it's been cooking all day. Also the meatballs by themselves are great for kids! And it is lovely with a nice glass of white ;-)

Sunday, October 16, 2011

Making Baby Food

Around Jack's 4 month birthday I started thinking about solid foods for him. He's a big boy with a big appetite and has been drinking 35-42 oz of breast milk per day since he was 16 weeks old. I know there are a lot of varying opinions about when to start solids, but after talking with my pediatrician, I decided to start him on rice cereal once a day when he was 4 months. Now, after a month of doing great with rice cereal, I've decided to go ahead and start introducing other solids. I feel like he's ready and my pediatrician is good with it, so I'm just going for it. Once I made the decision to start him on solids, I went back and forth about whether or not to make his baby food or just buy it. As a working mom, the convenience of buying it was pretty tempting, but in the end, for many reasons, I decided to go ahead and make it myself. 

I researched several brands of food processor systems made especially for baby food making, but in the end I decided to go with the Baby Bullet. After reading several reviews and talking with several sales people at Buy Buy Baby, it seemed to be the most "bang for your buck." Today I made sweet potatoes for Jack. It was super easy and even kinda fun. One large sweet potato made 11 servings. From start to finish, including prep work, it took me 30 minutes to make his whole week's worth of food. The one sweet potato cost me about the same amount as one jar of baby food. Maybe with the extra money I save momma can buy a new pair of shoes...I mean...put it in Jack's savings ;-) 

The best part of the whole adventure was watching Jack's face as he tasted his new food. At first he smiled and gobbled it up, but after the third bite or so he started gagging. I didn't take it too personally, as I read it's pretty normal for babies to gag when they eat something new because of the foreign taste and texture. Here are the few quick steps it took me to make the sweet potatoes today:


This is a cool feature, you click the date you made the food to know how long it's good.


Happy baby = happy mommy!


Saturday, October 15, 2011

The Great Pumpkin Festival

Today I had the best day with Jack- it was Pumpkin Festival day! I think I've been looking forward to this day since I found out I was pregnant. This morning I woke up singing pumpkin songs (bright and early at 5am- why don't little people understand sleeping in on weekends??) and even had pumpkin cookies for breakfast (what? It's practically like a holiday in my book...) Unfortunately though, my little pumpkin woke up on the wrong side of the bed and did not share in my enthusiasm. He has a little cold, so he wasn't feeling quite like his cheery self. But, despite that I still dressed his cute little bottom up and headed out bright and early- yes, I'm that mom. As we pulled in I was giddy with excitement, and daddy and Jack...eh, not so much. Pumpkin painting, hayride, corn maze, roasted corn, build a scarecrow, oh my! Just as I was about to get carried away, Jeremy quickly pointed out that we were there for 2 things: pictures and a ginormo pumpkin (details on that later). Way to rain on my parade...but next year, he better plan on making a whole day of it. Even though Jack didn't give me many smiles for my pictures, we still got some decent ones and ran into an old friend and her baby, which was an added bonus!


After the pumpkin patch and a nap, Jack and I made Halloween cards using his little handprint as a friendly ghost. This was yet another idea I saw on Pinterest. I love handprint art!


Thursday, October 13, 2011

Pinterest Party!

Ok, so admit it...you too, are Pinterest obsessed. You know you get a secret pinning high as you make your list of DIY projects. And for those of you that have no clue what I'm talking about, I highly advise you to join ASAP, so you too can waste more time on your computer or phone. It's the best thing to hit the internet since Facebook, really!

It has inspired me to get in touch with my crafty side and since I'm long overdue for a girls' night, I thought I'd kill two birds. I'm trying to decide between the following two crafts for our girls' night in. Or if we're really inspired, maybe both? Either way, there will be wine and food involved, so even if our crafts flop, hopefully it will still be a hit!


OR


Wednesday, October 12, 2011

Sausage Bread

This recipe is from my Aunt Mary and it is just decadent. She made some for me last week and I have been craving more ever since. My original intent was to bake for Jack's daycare teachers and my team, but I didn't double the recipe, so I didn't have enough to go around for everyone. Lesson learned...next time, I will definitely double the recipe. In my opinion, this bread is best served hot from the oven, so I prepared everything the night before and just popped them in the oven the next morning before work. Trust me, once you make this, it will become a favorite among those that you share it with!


1 lb hot sausage, 1/2 c green onions, 1/2 c parmesan cheese, 1/2 c Swiss cheese, 1/4 c canned japalenos (optional), 1 tsp salt, 2/3 c milk, 2 1/2 c Bisquick mix, 1 tsp butter (melted)


Preheat oven to 450 degrees. Brown sausage and onions together.


Drain extra fat.


Mix all other ingredients together.


I tried being neat and using a fork to mix this at first, but in the end you just need to wash your hands and have a little fun getting messy- otherwise you may be mixing with a fork for awhile. 


I rolled mine into balls, but you can also put into mini or regular muffin pans or a bread pan.


Bake at 450 for 20 minutes. The key to these is not to overcook or they will be very dry. And like I said, you may want to double the recipe because they go fast!

Tuesday, October 11, 2011

Mason Jar Obsessed!

I don't know why, but I find myself quite infatuated with Mason jars. Perhaps it's the nostalgia of a quaint country kitchen, perhaps it's memories of my grandma's yummy canned jams, jellys and pickles, or maybe it's just their simplicity that makes them so lovely. Whatever the reason, I find them perfectly charming and am always looking for creative ways to use them in my decor. I have found some really great ideas on Pinterest (speaking of obsessions) and can't wait to try them out.

Today I decided to use them as a part of my Halloween decor, using candy corn. I took an assortment of sizes and filled them a little less than halfway with candy corn, then set a tea-light candle on top. I'm displaying mine on my front porch, though I haven't decided exactly where yet. First I tried them between two chairs, clustered together on an outdoor coffee table. Then I experimented with them lined and clustered on a bench. I think they look really inviting on the coffee table, especially when lit, but I will continue playing around with them tomorrow. I also think they would be really cute in a kitchen window sill or on the kitchen table. Another idea I had was to tie some twine around the tops of the jars, which I may do later. Here are some of the ways I tried displaying them tonight. It was getting dark out, so the pictures aren't the best. Suggestions welcome!